Will It Break Like Augusta? Designing a Backyard Putting Green That Plays for Real
Yes, your landscape designer can build a putting green that actually reads, rolls, and breaks like the real thing. The secret is understanding golf first—slopes, breaks, pin placements—and then tucking it into the yard so it looks like it was always there.
Every golfer has hit it: the backyard putting green that is flat as a pool table, ringed by a bit of mulch, and abandoned by July. It rolls straight, it never surprises you, and it teaches you exactly nothing about the four-footer you keep missing on Saturday morning.
So—can a landscape designer build a green that feels true? Yes. But only one who understands how greens actually work. A real putting surface is a piece of engineering disguised as a lawn: every inch of fall is deliberate, every break is chosen, and every cup location is a decision about how hard the putt should be. Get those right, then make the whole thing belong in the yard, and you have the best seat in the house.
Flat is boring (and flat drains badly)
A perfectly flat green is the most common mistake in residential golf design. It looks clean on paper, plays like carpet, and holds water after every storm. Real greens are never flat. They tilt, roll, and fold, because that movement is both the challenge and the drainage plan.
The fun starts the moment the surface begins to move. A gentle tilt turns a straight putt into a read. A subtle ridge turns a lag into a decision. Suddenly you are crouched behind the ball like it is the 72nd hole—in your own backyard, holding a drink.
Proper slopes: the inches that decide everything
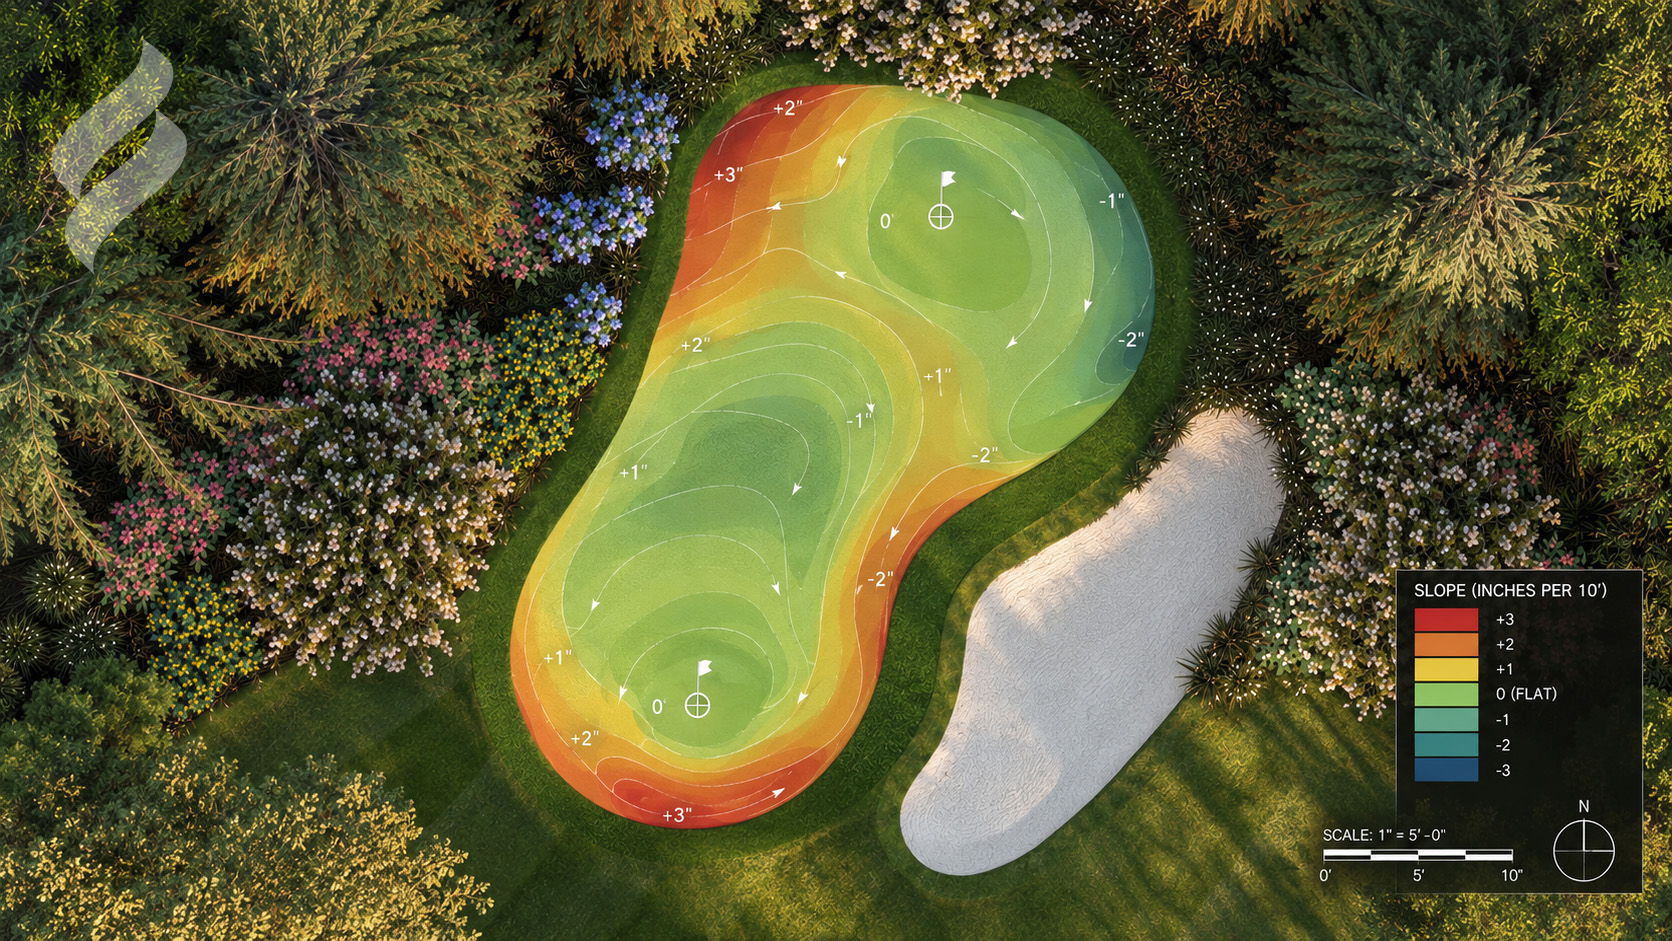
Here is where golf knowledge matters. Most well-designed greens move water and putts with slopes measured in small percentages—often roughly one to three percent across the playing surface. Push much past that around a cup and the ball simply will not stop; on a fast green, a putt that misses the hole keeps right on going to the fringe.
Speed changes the math. Greens are measured with a Stimpmeter, and the faster the surface, the gentler the slopes need to be. A synthetic green running at tour-like speed needs softer contours than natural turf mown for a casual roll. A designer who knows the target speed before drawing the grades avoids the classic heartbreak: a gorgeous green where half the cups are unplayable.
The slope map on this page shows how we think about it—color bands and contour lines in inches per ten feet, so the high side, the low side, and every flat landing zone are planned rather than discovered after installation.
Proper breaks: give the ball something to say
Break is what makes putting interesting. A good green offers a mix: a straight uphill putt to build confidence, a sweeping double-breaker that starts left and finishes right, and a slick downhiller that makes your palms sweat. Variety is designed—ridges, swales, false fronts, and gentle tiers placed so different cups produce completely different reads.
Breaks also have to make sense to the eye. Golfers read a green from the terrain around it, so the surrounding grades, the fall of the yard, and even where the house sits all shape how a putt looks versus how it rolls. Used well, that tension is the best part of the game; used badly, it just feels unfair.
Water follows the same lines the ball does. The contours that create break also carry rain off the surface to the edges and drains, so a well-read green is usually a well-drained green.
Pin placement: where the fun actually lives
On a real course, the superintendent moves the hole to change how the green plays. Your backyard should do the same. We plan multiple cup locations on relatively level pads—flat enough for the ball to stop, close enough to slope that the approach is never boring.
A front pin can be an easy uphill warm-up. A back pin perched above a ridge becomes a lag-putting test. A tucked pin beside the bunker is the one your friends will complain about. Two or three cups on a modest green, or several on a larger one, gives you dozens of different putts from the same surface.
Thinking about the short game too? Planning a chipping fringe, a tee box or hitting area, and a practice bunker at the design stage keeps landing areas, sightlines, and safety distances right from the start.
Natural turf or synthetic?
Natural bentgrass greens are the purist's choice and play beautifully, but they need very low mowing, precise watering, and regular care—close to golf course maintenance. Synthetic surfaces play consistently, need far less upkeep, and handle Northeast winters well when the base is built correctly.
Either way, the surface is only as good as what sits beneath it. Base preparation, compaction, drainage, and the shaped sub-grade are what create the break. The finish surface just reveals it.
Make it belong in the yard
A putting green should not look like it was dropped from a helicopter. The best ones sit in the landscape as if they grew there—shaped to follow the natural fall of the land, set where the morning light hits them, and framed by planting so the green becomes a garden room rather than an obstacle.
Planting does real work here. Layered beds of shrubs and perennials soften the edges and give the green its sense of place. Evergreens provide winter structure and a backdrop that makes the turf glow. We keep heavy-dropping trees back from the surface, avoid roots that will heave the base, and protect the sun the turf needs.
Then come the details golfers love: a stone path to the first tee, a bench to watch the next putt, low lighting for evening rounds, and a sightline from the patio so the green reads as part of the view. Done right, it is both a practice facility and the prettiest part of the yard.
Why the designer matters more than the turf
Anyone can lay synthetic grass. Designing a green that plays honestly, drains well, and looks beautiful takes someone who understands grading, drainage, construction, planting—and golf. Without that combination you get either a pretty lawn feature that plays like a hallway or a technically good green that looks out of place.
Our process starts with how you play: your handicap, how fast you like the greens, whether the kids will be on it, and how much maintenance you want. From there we draw the slope plan, pin locations, drainage, and planting together, so the installer builds exactly what was designed. You can see one of our backyard greens in the Private Green project on our Landscapes page.
Questions golfers ask
How big does a backyard putting green need to be? Even a modest green can play well with smart contours and two or three cup locations. Bigger greens allow longer lags and more pin variety.
Can it really break like a course green? Yes—if the slopes, speed, and pin pads are designed together. Break is planned with grading, not added afterward.
Will it survive a Northeast winter? A properly built base with good drainage handles freeze and thaw. Drainage is the single biggest factor in longevity.
Can it include a chipping area or bunker? Absolutely. Fringe, chipping zones, and practice bunkers are easiest to get right when they are planned with the green from day one.
Planning a new landscape in Pennsylvania or the Northeast? We would love to hear about your property.